What are Price-Level Buttons and how do I create them?
Price-Level Buttons can be created & edited from the Hazlnut dashboard!
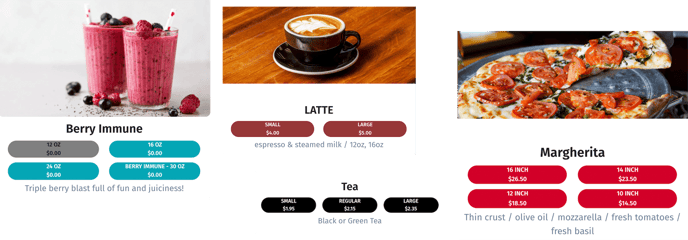
Make sure you have separate items for each of the different sizes or variations, rather than using modifiers. Once the price-level buttons have been created, you'll have something like these:

In order to create these buttons, you must first make sure that they are in your PoS inventory. They should be setup as separate items with their own special prices (e.g. Tea - Sm $1.95; Tea - Reg $2.15; Tea - Lg $2.35)
Once all the items have been created and the correct prices are assigned, log into the Hazlnut dashboard.
- Go to the Menu Management page
- Click 'Sync PoS Menu' & wait for the successful-sync notification to appear
- Go to the Items tab
- Click modify next to the item you would like to be set as the 1st button (typically the plain option or smallest size)
- Change the Displayed Name to something generic and simple (e.g. Tea - Sm should be changed to 'Tea' so it is universal to the other sizes)
- Change 'Show as parent with price levels?' to YES
- Enter your 'Parent Button Name'
- This is the name of the current item you are working on, what would you like the button to say? (e.g. Tea - Sm should be changed to 'Small')
- Click 'Add Child Item'
- The child items will appear alongside the parent items as other buttons with their own names. Make sure the child items you select are directly related to the parent item.
- Select the item
- A window will appear asking you to enter the displayed name for the child item. This is what the button will say (e.g. Tea - Reg should be changed to 'Regular' and Tea - Lg should be changed to 'Large')
- Click 'Add Items'
- Now you can drag-and-drop the child items into their correct display orders
- Remember to click 'Update Order' and save your changes!
To see the published updates: clear your Hazlnut cache or recent browsing history before refreshing the page.
To remove the price-level buttons:
- Go to the Menu Management page
- Go to the Items tab
- Click Modify next to the item that is set as the 1st button (typically the plain option or smallest size) - It will be at the top of the chain links in solid/bold grey
- Scroll down about halfway to where it says "Show as parent with price levels?"
- Select NO
- Remember to update the parent item Display Name to be correct
- Save your changes
Remember to update the Display Name to be correct for the parent and child items
Remember to set the child items to appear online
To remove 1 or more, but not all, buttons from the price-level:
- Go to the Menu Management page
- Go to the Items tab
- Click Modify next to the item that is set as the 1st button (typically the plain option or smallest size) - It will be at the top of the chain links in solid/bold grey
- Scroll down about halfway to where it says "Show as parent with price levels?"
- Tap on the red minus symbol next to the Child Item that you wish to detach
- Remember to update the parent item Display Name to be correct
- Save your changes
Remember to update the Display Name to be correct for the parent and child items
Remember to set the child items to appear online
